


canvas+particle 实现文字粒子效果。
这里简单加个备注,之前群里有人问这个是如何实现的,当时以为是three.js效果,看了原网站是利用dat.gui.js脚本,大概是把base64的图片进行粒子化输出。不过我仍然没有想明白他是如何把canvas背景进行透明化处理的。
很遗憾canvas特效这方面没有具体的教程或者博客文章作为参考,只是国外的友人进行了相关的操作,我移植过来进行了改写和必要的注释,最重要的目的不是去学习前端的canvas而是这个特效如果透明化处理会是很酷炫的博客签名。
以下是代码,作为记录,虽然已经可以完美嵌入到前端页面之中,不过无法透明化背景处理,失去了使用价值。但还是希望有一天可以改写清楚,不浪费我半天的时光。
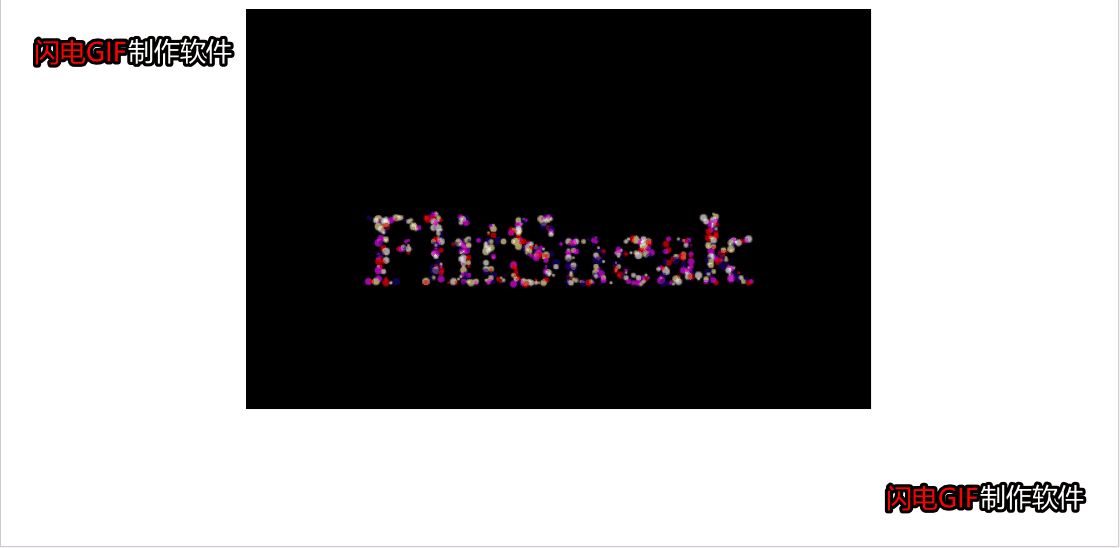
效果如下:
代码如下,复制到html,改后缀为html即可运行。
<!doctype html>
<html>
	<head>
		<meta charset="utf-8">
		<title></title>

		<style>
			#myCanvas {
				width: 100%;
			}

			#contain {
				margin: 0 auto;
				width: 31.25rem;
				height: 20rem;


			}
		</style>
	</head>
	<body>
		<!-- 简单来说,这个原理为:在黑色canvas上用白色的笔画出文字,然后把整个canvas输出为图片对象,然后加载每一个像素进行判断;
		如果是白色的rgb格式则随机赋予颜色从而重新输出整张画。鼠标的位置变动都会刷新图片。 -->
		<div id="contain">
			<canvas id="myCanvas"></canvas>
		</div>
		<script>
			/*jshint esversion:6*/
			var contain = document.getElementById('contain');
			var can = document.getElementById('myCanvas');
			var ctx = can.getContext('2d');

			function resize() {
				//can.width = window.innerWidth;
				can.width = contain.offsetWidth;;
				//can.height = window.innerHeight;
				can.height = contain.offsetHeight;;
			}
			const max_radius = 3; //最大粒子半径
			const min_radius = 1; //最小粒子半径
			const drag = 30; //粒子恢复速度
			window.onresize = function() {
				resize();
			};

			function cfill() {
				ctx.fillStyle = "#000"; //填充样式,可填充渐变色
				//ctx.fillStyle ="rgba(255, 255, 255, 0)";
				ctx.fillRect(0, 0, can.width, can.height); //填充为矩形,x,y为矩形左上角位置坐标
				ctx.globalAlpha=0.5;
				ctx.fill();
				// ctx.fillText()
			}
			var mouse = { //声明mouse对象,该对象有两个属性x,y.可以通过mouse.x调用。
				x: -1000,
				y: -1000
			};
			can.onmousemove = function(e) { //canvas.addEventListener('mousemove', doMouseMove,false);
				//mouse.x = e.clientX;//鼠标相对于浏览器窗口可视区域的X,Y坐标(窗口坐标)。 Canvas上鼠标事件中不能直接获取鼠标在Canvas的坐标,所获取的都是基于整个屏幕的坐标。
				mouse.x = e.offsetX;
				//mouse.y = e.clientY;
				mouse.y = e.offsetY;
			};
			can.ontouchmove = function(e) { //触摸事件,手指的相对位置。
				mouse.x = e.touches[0].offsetX;
				//mouse.x = e.touches[0].clientX;
				mouse.y = e.touches[0].offsetY;
				//mouse.y = e.touches[0].clientY;
			};
			resize();
			cfill();

			function distance(x, y, x1, y1) { //计算两点之间的距离,这里明显是计算粒子与鼠标箭头的距离。
				return Math.sqrt((x1 - x) * (x1 - x) + (y1 - y) * (y1 - y));
			}

			class Particle { //这是粒子类 js的面向对象属于js高级
				constructor(pos, target, vel, color, radius) { //构造器
					this.pos = pos;
					this.target = target;
					this.vel = vel;
					this.color = color;
					this.radius = radius;
					var arr = [-1, 1];
					this.direction = arr[~~(Math.random() * 2)] * Math.random() / 10; //随机化粒子初始方向,unity会接触到。0表示粒子保持默认方向,1表示完全随机方向。~~和>>>0语法差不多为的是保证数值为正整数。
				}
				set(type, value) {
					this[type] = value;
				}
				update() {
					this.radius += this.direction;
					this.vel.x = (this.pos.x - this.target.x) / drag; //粒子位置和目标位置之差除以拉伸速度为实际位置
					this.vel.y = (this.pos.y - this.target.y) / drag;
					if (distance(this.pos.x, this.pos.y, mouse.x, mouse.y) < 100) { //粒子和鼠标箭头的距离
						this.vel.x += this.vel.x - (this.pos.x - mouse.x) / 15;
						this.vel.y += this.vel.y - (this.pos.y - mouse.y) / 15;
					}
					if (this.radius >= max_radius) {
						this.direction *= -1;
					}
					if (this.radius <= 1) {
						this.direction *= -1;
					}
					this.pos.x -= this.vel.x;
					this.pos.y -= this.vel.y;
				}
				draw() {
					ctx.beginPath();
					ctx.fillStyle = this.color; //填充颜色样式
					ctx.arc(this.pos.x, this.pos.y, this.radius, 0, Math.PI * 2); //画一个圆x,y为圆心坐标,后面依次是半径,起始角和终止角度。
					ctx.fill();
				}
			}
			var particles = [];
			var colors = ["#ff0000", "#ffff7f", "#00007f", "#ff00ff", "#f9f9f9"];
			var bool = true;
			var current = 0,
				i; //意思是声明两个变量,一个current=0,一个i。
			function changeText(text) {
				var current = 0,
					temp, radius, color;
				//cfill();
				ctx.fillStyle = "#fff";
				ctx.font = "80px Times";
				ctx.fillText(text, can.width * 0.5 - ctx.measureText(text).width * 0.5, can.height * 0.5 + 60); //text,x,y 相对于画布的x,y坐标开始绘制文本。
				var data = ctx.getImageData(0, 0, can.width, can.height).data; //通过 getImageData() 复制画布上指定矩形的像素数据。这是像素的数组对于rgba来说。
				//cfill();
				// 对于 ImageData 对象中的每个像素,都存在着四方面的信息,即 RGBA 值:
				// R - 红色 (0-255)
				// G - 绿色 (0-255)
				// B - 蓝色 (0-255)
				// A - alpha 通道 (0-255; 0 是透明的,255 是完全可见的)
				// color/alpha 以数组形式存在,并存储于 ImageData 对象的 data 属性中。
				for (i = 0; i < data.length; i += 8) {//实际是遍历像素的二维数组,一维是像素数组长度,二维是每个像素的r g b a。+8是跳一个元素。
					temp = {
						x: (i / 4) % can.width,
						y: ~~((i / 4) / can.width)
					}; //相对定位
					if (data[i] !== 0 && ~~(Math.random() * 5) == 1 /*(temp.x % (max_radius+1) === 0 && temp.y % (max_radius+1) === 0)*/ ) {
						if (data[i + 4] !== 255 || data[i - 4] !== 255 || data[i + can.width * 4] !== 255 || data[i - can.width * 4] !==
							255) {//前面画笔为白色#fff 即rgb(255.255.255)。
							if (current < particles.length) {
								particles[current].set("target", temp);
							} else {
								radius = max_radius - Math.random() * min_radius;
								temp = {
									x: Math.random() * can.width,
									y: Math.random() * can.height
								};
								if (bool) {
									temp = {
										x: (i / 4) % can.width,
										y: ~~((i / 4) / can.width)
									};
								}
								color = colors[~~(Math.random() * colors.length)];//筛选出来的元素随机颜色赋值。
								var p = new Particle(
									temp, {
										x: (i / 4) % can.width,
										y: ~~((i / 4) / can.width)
									}, {
										x: 0,
										y: 0
									},
									color,
									radius);
								particles.push(p);
							}
							++current;
						}
					}
				}
				bool = false;
				particles.splice(current, particles.length - current);
			}

			function draw() {
				cfill();
				for (i = 0; i < particles.length; ++i) {
					particles[i].update();
					particles[i].draw();
				}
			}
			changeText("FlitSneak");
			setInterval(draw, 1);//1的单位是毫秒
		</script>

	</body>
</html>
由于本人并不了解canvas,最初的想法是用透明canvas输出彩色字体,然后发现透明canvas无法有效检测翻转色彩,是否要遍历像素对透明部分进行保留也让我绕了很久。第二种想法是遍历每个像素时,如果像素是白色则替换成彩色像素,否则其余的部分赋值为透明色。但要尝试这种想法又有两个困难,一是我对js高级语法不熟悉,对canvas元素的操作也肯定要踩很长时间坑出不来。如果有人能碰巧看到又碰巧实现了,那万分感谢,务必让我对此代码膜拜一二。
Q.E.D.


Comments | 0 条评论